EAT YOURSELF WELL

Inspiration | Information | Recipes

  • Home
  • About
  • Recipes
  • Wellness Retreats
  • Sites We Love
  • Shop
  • Inspiration

Seriously Craveworthy Carrots

March 12, 2016 by Jennifer Silverberg Leave a Comment

IMG_8343I was shooting for a quick, healthy way to cook a bag of organic baby carrots … and, OH did I come up with one! Can’t wait to hear if your family loves this as much as I do!

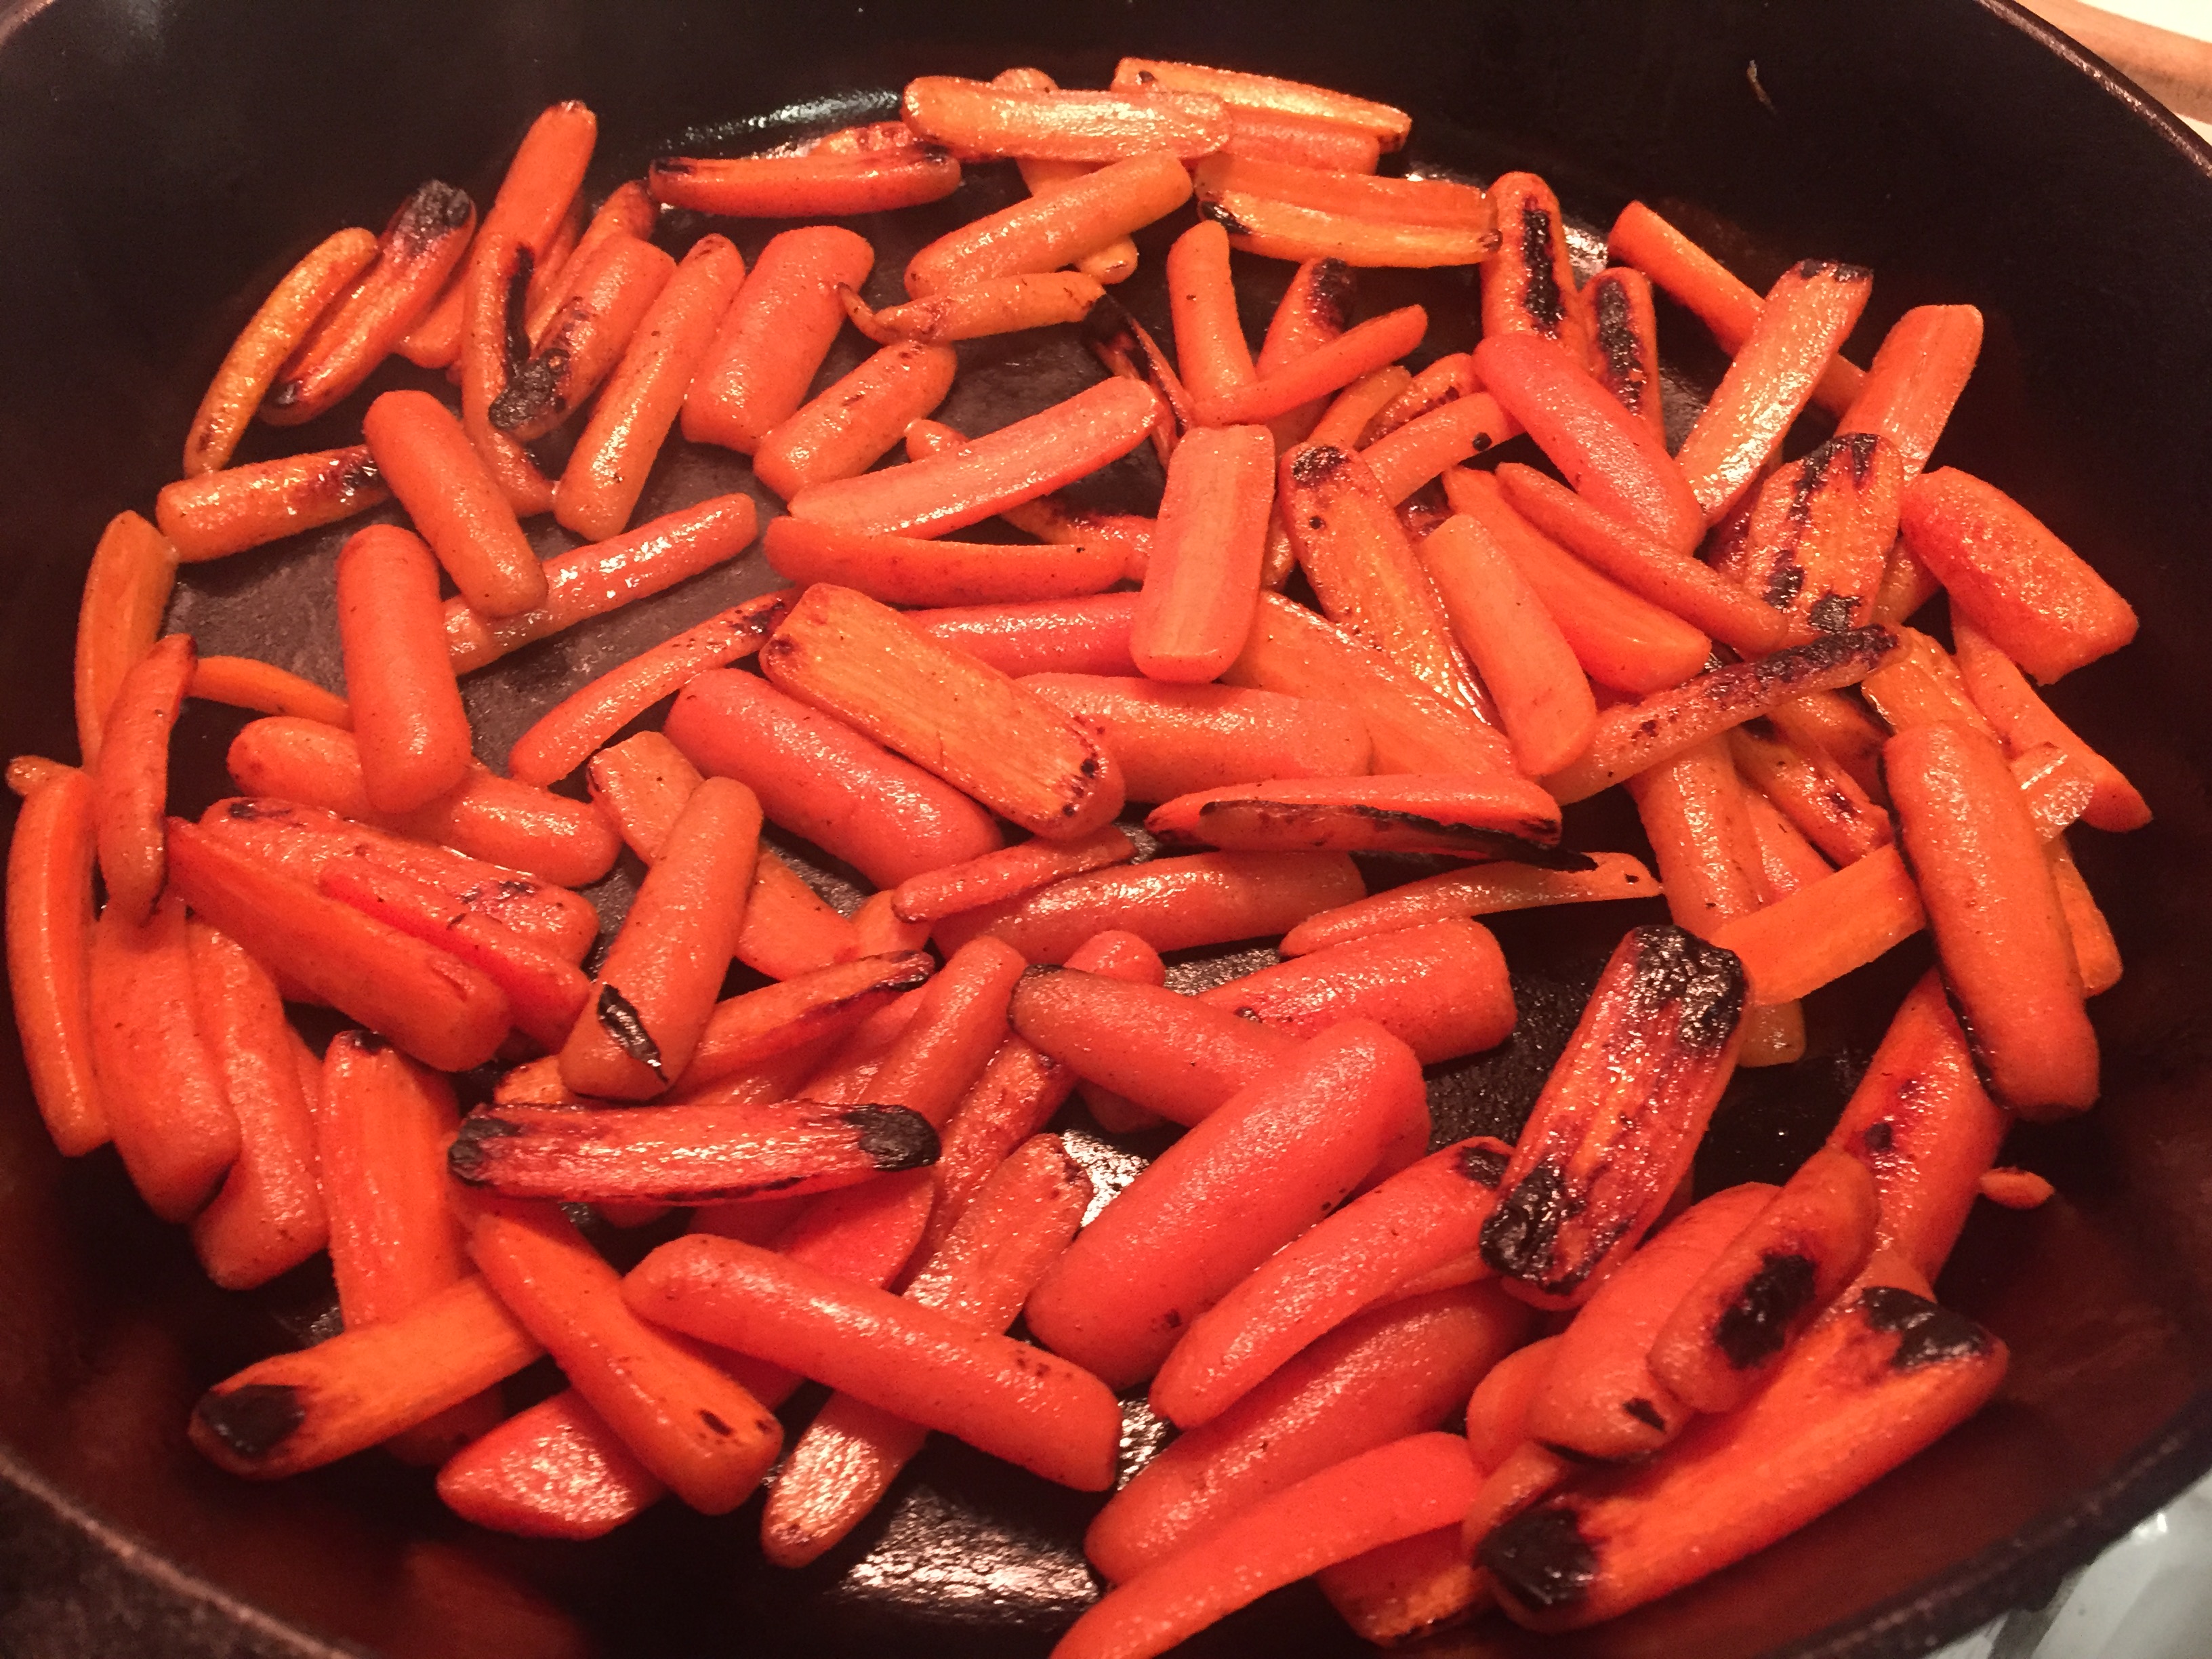
Grab a bag of baby carrots … and cut each one in half lengthwise (so they stay long, but are just thinner). I hear you groaning, but this takes about 4 minutes and gives you way more surface area, which you’re going to want.

Meanwhile (while you’re chopping the carrots), heat a large cast iron skillet up on medium high to high heat – as high as it can take. When it’s hot, add 1 tbsp of coconut oil and let it melt.

When melted, add the sliced carrots (see, that was fast, right?) to the pan and push them around so they are as much in a single layer as possible. Now the important part – DO NOT MOVE them for at least 3-4 minutes, or until you see charred bits developing on some of the bottoms. Really important – it’s the charring that makes a difference. Once the bottoms develop a char, stir them around a bit, let them char some more, and repeat until you’re starting to worry if you’ve cooked these carrots too much (you haven’t). At that point, turn off the heat, sprinkle the carrots with sea salt to taste, and cover. Leave covered for about 3-5 minutes, or until the carrots are fork-tender.

From this point, your choices are:
– Eat them exactly as they are (yeah, I’ve eaten them straight out of the pan, too :-))
– Sprinkle with your favorite vinegar or squeeze of lemon for acidity (my favorite – I LOVE the vinegar – kind of like smoky Salt/Vinegar chips, only clean eating!)
– Toss them in a bit of curry powder, and lime if you like
– Toss in hot sauce and honey

Filed Under: Growing Your Own (Veggies), Healthy Lifestyle, Kids and Food, Make it Crave-Worthy!, Recipes we LOVE, Uncategorized Tagged With: carrots

Quick guide to sprouting!

October 11, 2014 by Jennifer Silverberg Leave a Comment

SproutingSuccessSprouting is a lot easier than it seems, and you’ll be amazed at how a tiny bit of seed can make piles and piles of sprouts for your sandwiches, salads, casseroles, etc. They’re also great by the handful as quick snacks!

Be sure to involve the kids – you’ll be amazed at how they’ll want to eat the sprouts they grow!

What Equipment Do I Need to Make Sprouts?

A container
Options are almost all affordable (<$20), and range from simple containers with built-in sieves to multi-tiered versions for sprouting several varieties at once. You can also use a simple glass jar with mesh/cheesecloth secured by a rubber band over the opening or screening fastened by a metal, screw-top ring, like this one from Amazon.

Water
Use fresh, clean water (non-chlorinated is best).

Untreated seeds
A few tablespoons of small sprouting seeds (like alfalfa or clover) to half a cup of seed (for large seeds like lentils or beans) are all you need to produce sprouts for sandwiches, salads, and other dishes. Sprouts will double or triple in size, depending on the size of the seed and the variety you are sprouting. Start small, to help ensure you don’t end up with sprouts going bad in your refrigerator. Seeds and mixes are available online from sprout and seed companies, from Amazon, or at your local health food store. You may want to try mixes that include more than one seed type, which can add a nice variety to your sandwiches and salads.

To sprout

  • Rinse seeds under water to clean them and remove any dust or dirt.
  • Spread them evenly in your container to form a thin layer. Do not let them pile on top of one another.
  • Cover your seeds completely and soak for 6-12 hours. (Be sure to poke down any floaters.) This helps encourage sprouting.
  • Drain water from the seeds and keep moist. If using a jar, try laying on one side for more even distribution.
  • Rinse and drain 2-3 times per day. Rinse sunflower seeds more frequently, since they will get slimy. Rinse or pick off seed skins to prevent rotting.
  • After your seeds have sprouted, rinse and drain regularly (every 8-12 hours) until sprouts reach the desired length.
  • Eat fresh or store in the fridge until consumed. Most sprouts last 1-2 weeks when kept cool.
  • Average Number of Days to Finish Sprouts
    Lentil Sprouts: 3-4 days
    Mung bean Sprouts: 3-5 days
    Radish Sprouts: 4-5 days
    Mustard Sprouts: 3-6 days
    Alfalfa and Clover Sprouts: 5-6 days

    Filed Under: Growing Your Own (Veggies), Kids and Food Tagged With: eat yourself well, how to sprout, sprouts

    Six Ways to Hook Kids on Real Food

    September 10, 2014 by Jennifer Silverberg

    6 Ways to hook kids on real food

    With the world (meaning, food marketers) trying their best to hook your kids on their junky packaged foods, you’ve got to fight back hard! And we know – you’re already busy just trying to get your kids to school/practice/lessons/play dates/etc. … you don’t have time to give them food lectures (and lectures don’t work, anyway)!

    Here are 6 fun, simple ways to help break the hold the food companies have on your kids, and instead hook them on healthy, amazing, REAL food:

    1. Grow Food: Even if you only have room for a small pot of herbs in a city apartment, involving a child in growing has been shown to pay lifetime dividends in vegetable consumption. A child who helped grow the parsley will HAPPILY urge the whole family to taste their very own parsley salad.

    2. Introduce kids to “ingredients” in their native form: If you’re making soup, keep little bits of the raw ingredients aside for a “tasting session,” then have them try to identify the celery, the onion, the carrot, etc. in the soup. Discuss how cooking changes the texture and flavor of the ingredients.

    3. Keep herbs/spices and interesting condiments on the table, and encourage experimentation: I learned this when I left cinnamon on the table, and my son added it to an almond butter sandwich. It turned out to be a great flavor combo, and he gobbled down the sandwich that “he” had made. Hot sauces, flavored oils, fun spices like ginger and vanilla, and other tasty add-ins will help build interest and creativity around the whole foods you’re serving, and help kids personalize their food.

    4. Build a family cookbook: Encourage kids to take pictures of their favorite meals/dishes (get family members in the pics, too!), name the dishes together, and keep them in a photo album. Keep it in the kitchen as a frequent reminder of the great real food family times you’ve had, so your kids learn to associate real food with great moments.

    5. Celebrate with Real Food! Don’t fall prey to the seductive marketing message to use celebrations as an excuse to eat junk. That sends exactly the wrong message: that these foods are “rewards,” and these false “rewards” become anchored in the pleasure centers of your child’s brain. Instead, celebrate by making extra-beautiful, extra-fresh meals together during the holidays and other special days.

    6. COOK TOGETHER: Nothing else will make your child more immune to the marketer’s siren song about “convenience” than this. When your child knows that an egg can be cooked, a salad can be tossed, a veggie can be braised, or a smoothie can be blended in literally minutes, you give them the tools and the tastebuds they need to resist the call of the microwaved Frankenfood that marketers want them to buy.

    Most of all, make real food a centerpiece of loving family moments, and kids will grow up associating real food with great family feelings.

    Six Ways to Hook Kids on Real Food, by Jennifer Silverberg, Eat Yourself Well

    Filed Under: Growing Your Own (Veggies), Healthy Lifestyle, Kids and Food, Why I'm in a Food Fight Tagged With: food marketers, healthy eating, hook kids on real food

    Gardening – One great reason why … and three ways to keep it super-simple!

    August 1, 2014 by Jennifer Silverberg Leave a Comment

    Why garden?

    That’s one great reason to try gardening … and then there’s money savings, taste, nutrition, and I could go on and on! However, I struggle with it for years until I realized the three things that made it workable for me (a crazy busy mom with a career or two going on).

    1. Forego digging … forever. The best thing I ever did was buy my handheld tiller (I use this super-simple Mantis), which gets me to the fun part, faster. When I used to have to face down hours with the shovel, and the resulting clods of dirt/clay (I live in GA), I tended to put off planting until it was too late. Oh, and your back will thank you, too.

    2. Select a manageable number of plants, and stick to those few. When I bought “a little of everything,” and just stuck it in the ground and hoped for the best, about half of it failed. Now, we stick to the 5 (for me, that’s the magic number) foods that my family loves the most in the summer, and then plant greens around them for the fall. You can always trade with friends who are growing other things, and supplement at the farmer’s market.

    3. Use soaker hoses. Buy enough non-toxic hoses (here’s why) – once – to lay them down your rows of plants, and leave them there the whole growing season. Dragging a hose all around your garden is a daily … drag. Setting them up once is an hour or so project. After that, all you have to do is turn on the hose for a bit, and then remember to turn it off (set a timer if you’re anything like me).

    That’s what helped me – hope it helps you get gardening this season!

    From Jennifer Silverberg at www.EatYourselfWell.com and facebook.com/eatyourselfwell Please maintain link as you copy and share recipe with others!

    Filed Under: Food Supply, Growing Your Own (Veggies), How to Live Tagged With: eat yourself well, garden, Mantis, seed to table, vegetables

    Are you ready to…

    Lets get social


    Want more? Follow us on social media.

    Take a look around

    Favorite Posts

    Recent Posts

    • COVID Has Reminded Us: Health REALLY Matters
    • Amazing and Easy Banana Bread
    • Healthy Resolution!
    • Happy Healthy Christmas Salad!
    • Quick Comfort Food: Grits and Greens (Plant Based!)

    Popular Posts

    101 Fast/Healthy/Fabulous Snack Ideas

    Copyright © 2025 · Foodie Child Theme by Shay Bocks · Built on the Genesis Framework · Powered by WordPress