EAT YOURSELF WELL

Inspiration | Information | Recipes

  • Home
  • About
  • Recipes
  • Wellness Retreats
  • Sites We Love
  • Shop
  • Inspiration

Amazing and Easy Banana Bread

January 26, 2020 by Jennifer Silverberg Leave a Comment

I’m not really a baker … I’m not even a big eater of baked goods (other than an amazing long-fermented sourdough bread made by a local baker at the farmer’s market, YUM). However, after the holidays, when the weather is a little dreary, I sometimes want something warm and sweet in the oven, and this banana-forward loaf (also great as muffins) does the trick!

BananaBreadMontage

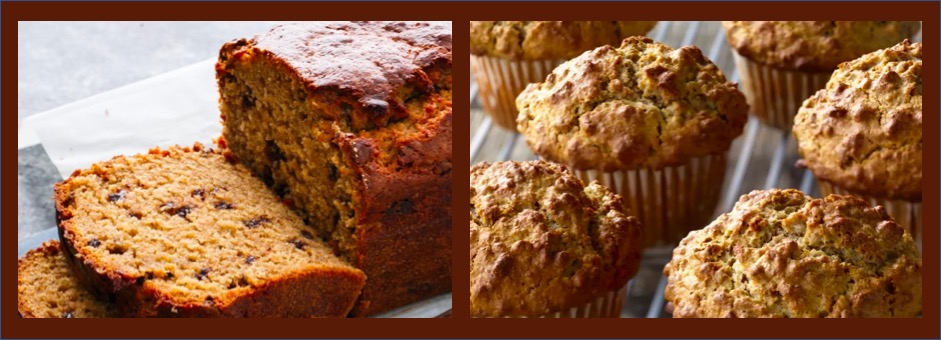
Jennifer’s Banana Bread
Makes two large loaves – feel free to halve the recipe if you like, but it’s great to have an extra loaf to freeze or share!
Ingredients
• 6 medium overripe bananas (freeze ones as they get really brown and use any time!)
• 2/3 cup high quality maple syrup
• 1/2 cup organic brown sugar
• ½ to 2/3 cup avocado oil (or your favorite baking oil)
• 4 teaspoons vanilla extract
• 4 cups all-purpose flour
• 2 tsp baking soda (make sure it’s fresh)
• 1 tsp ground cinnamon
• 2 tsp salt
• 1 cup toasted pecans (or walnuts or chocolate chips or whatever you like – go crazy here!)
For Topping
• Up to ½ cup (to taste – depends how sweet you want it) mix of organic brown sugar and maple syrup – or one or the other if you only have one.

To make:
1. Preheat oven to 350°. Drop parchment paper into your pan (or oil the pan, but parchment is SO easy) or use muffin pans.
2. Toast pecans lightly in a pan – just drop them in and let them toast until lightly brown and fragrant, tossing regularly.
3. Mash bananas with a fork or potato masher. I sometimes just leave them lumpy and then use an immersion blender after adding the other wet ingredients (next step).
4. Add maple syrup, brown sugar, oil, and vanilla. Stir until really well-mixed – or use an immersion blender to get a little smoother – don’t liquefy though.
5. Toss the dry ingredients (except toasted pecans) well in a separate bowl.
6. Add the dry ingredients to the banana mix and stir everything together until just mixed. Don’t overmix or the bread will be chewy (ugh). The batter will be thicker than you think.
7. Fold in the pecans (or whatever you’re adding).
8. Place the batter into the pan and smooth out with the back of a spoon.
9. Combine the topping ingredients and immediately spread over the top. Don’t let the sugar dissolve into the syrup, you want the texture.
10. Bake for 50 minutes, or until a toothpick inserted into the center comes out clean.
11. Remove the pan from the oven put it on a cooling rack. Allow it to cool for at least 15 minutes before removing it from the pan.
12. Slice and serve.

Filed Under: Breakfast Recipes, Healthy Treats, Holiday Cooking, Recipes we LOVE, Uncategorized Tagged With: banana bread, vegan

Happy Healthy Christmas Salad!

December 24, 2018 by Jennifer Silverberg 2 Comments

Christmas Salad

This simple Christmas salad is drop-dead gorgeous AND a welcome break from heavier holiday standards! I love using a veggie chopper like the Vidalia Chopper for this, because it makes perfectly even squares for a really pretty salad, and I think it even tastes better because there are so many tasty surfaces!

A big bowl of this salad plus a bit of bread is a great light meal, or add a soup if you need some warming!

Celebrate in holiday colors with this fresh-tasting snowy green and white salad. ENJOY!!

Salad Ingredients
1 cup white quinoa (uncooked)
2 cups water
2 large red bell peppers, finely chopped
1 large green bell pepper, finely chopped
1 medium white or yellow onion
1 cup very finely chopped green or red kale, any type, but chop super-finely, as you would an herb, or like parsley for tabbouleh (this is also fabulous with parsley or any other green)
1 cucumber, finely chopped
crumbled feta cheese (omit to make vegan)

Dressing Ingredients
1/4 cup olive oil
2 garlic cloves
2 tablespoons lemon juice or white wine vinegar
1 1/2 tablespoons Dijon mustard
two pinches sea salt
freshly ground black pepper
1/2 avocado (if available)
1/2 seeded jalapeño (if desired)

Cook the quinoa in the two cups of water (I’m guessing you have a favorite method already; if not, the simple method is to rinse the quinoa, add 2 cups water for one cup quinoa, bring to boil then turn down to simmer, covered, for about 15-20 min or until you can see the white curly bits).

Cool the quinoa for a few minutes at least (can be cooked ahead and refrigerated). Toss together with the other salad ingredients, except feta cheese.

Combine dressing ingredients in your blender and blend for a few seconds until smooth.

This can all be done up to 4 hours or so before eating; add the dressing, sprinkle with feta and stir to mix, 30-60 minutes before serving to let flavors combine.

Feel free to add your own touches to this salad – it’s a great base. Try:
Mexican style: add pepitas, tomato, avocado chunks, black beans and corn, and cumin.

Mediterranean style: add oregano, olives, and herbs de provence seasoning.

Superfood style: avocado, winter squash, diced beets, pumpkin seeds and arugula

Filed Under: Fast Recipes, Holiday Cooking Tagged With: christmas salad, kale salad, superfood salad

Quick Comfort Food: Grits and Greens (Plant Based!)

December 16, 2018 by Jennifer Silverberg Leave a Comment

So …some (most? :-)) days, I look forward to comfort food for dinner … but don’t have the time it takes for most slow-cooked meals, and don’t want the junk that comes pre-packaged. This super-fast grits/greens recipe takes no time at all, but tastes like love, feels like something grandma used to slave over, and takes <15 minutes from idea to table!

Oh, and it’s ALL plant based – so you’re going to feel great afterwards! Feel free to play around with the recipe – use what you have on hand! No greens? Sub broccoli (or brussels sprouts or …)! Have a batch of peppers about to go bad? Add them! And so on!

Enjoy.

Quick-cook Comfort Food: Grits and Greens (Plant Based!)

Serves: 2-3

Grits:

3 cups water
¼ teaspoon salt
1 cup white corn grits or medium grind organic cornmeal
1 tablespoon vegan “butter” or olive oil
3 tablespoons nutritional yeast
Black pepper, to taste
About ¼ cup of any non-dairy milk or cheese – as you have on hand, or you like

Bring water and salt to a boil – dump in grits and stir. Reduce heat to medium low. Cook, stirring regularly, for 5-10 minutes, or until the grits are thick and creamy (cooking time will depend on the type of grits you use – course grains may take a little longer). When ready, turn off the head and stir in vegan “butter” or olive oil, nutritional yeast, non-dairy milk/cheese (if using), plus a grind of black pepper to taste.

Greens:

Splash olive oil
1 small- medium yellow onion, diced
3 cloves garlic, minced or crushed
2 cups vegetable broth (I REALLY like this one)
1 teaspoon smoked salt (I used Maldon but if you don’t have smoked, use regular)
~½ teaspoon red pepper flakes
1 lb cleaned organic greens – I love a mix of collards and kale, but either/any would do. See screen shot for reference – this is a LOT of greens
Hot sauce of your choice – I LOVE this one, it’s kind of magic: https://wildbrine.com/product/smoky-jalapeno/

Even faster: bought these already trimmed and cleaned from the farmer’s market!

Add a splash of olive oil to a large deep skillet or pot, and set to medium heat. Add onions and saute until almost tender, then add in garlic. Cook til onion and garlic are fragrant, about 2-3 minutes. Add vegetable broth, smoked salt and red pepper flakes. Now is a good time to taste the mix for balance. If it needs salt, this is a good time to add. Bring to a simmer, then add in the greens. It will seem like WAY too much, but toss the greens around a bit into the liquid and they’ll quickly start to reduce. Cook for about 5-10 minutes for tender young greens, or up to 20 minutes for more mature greens (just keep tasting little bits until it’s as tender as you like). Add a squeeze of hot sauce, or more salt, pepper, red pepper flakes if you like. If you can find Wildbrine Probiotic Sriracha, I would HIGHLY recommend it – kinda rocked my world when I made this today! But, any Sriracha would be delicious!

Optional:

This meal is delicious as-is, but if you would like some meat or something “meaty” on top, this can be topped with sausage or veggie sausage links (as shown in the pic). Just brown and slice before serving.

Plating:

In a low, wide, bowl, fill half the plate with grits, then the other half with greens. Spoon the pan liquids from the greens pan over everything, and serve and enjoy!

Good with:

Great by itself, but a vinegar-heavy side salad would be nice, too!

Filed Under: Fast Recipes, Recipes we LOVE, Superfoods, Winter Recipes Tagged With: comfort food, dinner, greens, grits, winter

Cantaloupe-Fig Bowl: Savory/Sweet tastes of Summer!

July 28, 2018 by Jennifer Silverberg 1 Comment

Cantaloupe Fig Bowl Delicious

Summer brings so many AMAZING flavors – tomatoes, corn, berries, okra … omg so much! But the first week I find figs at the farmer’s market, I tend to go a little crazy with them (last year wound up with chia-fig preserves, yummmm).

AND, they tend to come in right at the same time as the best cantaloupe – the tasty kind that reminds me of the ones you get in Italy – bursting with natural sweetness. These simple ingredients, plus a bit of thinly sliced fennel, chopped fresh almonds, and a bit of citrusy dressing, made for an amazing salad/dessert (yeah, it could be either) I’m excited to share!

Sweet/Savory Cantaloupe-Fig Bowl

Serves Two

For the bowls:
– One small cantaloupe – peeled and cut in half
– About a pint of figs – cleaned, trimmed, and cut in slices
– A bit of thinly sliced fennel – the white part (OK to leave out if you don’t have any or don’t like fennel, but adds to the flavor depth)
– Handful of raw, unsalted almonds – chopped pretty finely, but roughly

For the dressing:
– Few tablespoons of olive oil
– Tablespoon of honey
– Juice from half a lemon
– Pinch of salt
– Pepper, to taste (can be added later)

To assemble: take the halves of the cantaloupe and cut a thin slice at the bottom to help them sit evenly on a plate. Fill with the sliced figs. Sprinkle with the thinly sliced fennel and top with the chopped almonds. At least a half hour before serving, mix the dressing, shake to combine, then pour into the cantaloupe bowls. Serve at room temperature (this holds well).

Making it your own: If you’re serving this for dessert, you may want to amp up the sweetness by adding a bit more honey – as a salad, you could use even less. As I noted, I love the fennel because of the unexpected layer of flavor, but feel free to leave out if you don’t like it. And, experiment! This recipe would also work well with mint, basil, thinly sliced green onion, just as starter ideas. A bit of arugula would be fun, for a spicy bite.

Happy, healthy eating!

Serve as a side salad with ratatouille pasta!

This is a treat for your eyes as well as your body!

Filed Under: Healthy Treats, Recipes we LOVE, Summer Recipes Tagged With: cantaloupe, fennel

Healthy Breakfast: Magic Sweet Potatoes

May 9, 2018 by Jennifer Silverberg 1 Comment

Friends are always asking me for easy, healthy breakfast ideas – and this is one of the easiest. You can even bake 5 sweet potatoes at the start of the week, and enjoy these cold out of the fridge in less than a minute prep time (experiment with the magic sauce to keep it interesting!).

In addition to being super-delicious, sweet potatoes are quite filling due to their high fiber content. Sweet potatoes are a fantastic source of vitamins and minerals including iron, calcium, selenium, B vitamins and vitamin C. They’re also very high in beta-carotene, an antioxidant that converts to vitamin A in the body (1 cup provides 375% your daily value)!

Do you have a favorite sweet potato topping? Please share in the comments below!

Filed Under: Breakfast Recipes, Healthy Snacks, Healthy Treats Tagged With: breakfast, easy, sweet potato

Chocolate Power Balls – Delicious and Easy

March 18, 2018 by Jennifer Silverberg 1 Comment

This Chocolate Power Balls recipe is one of the top 3 reasons I keep a small food processor on my counter – yes, that is precious space, but I like to keep a few fresh Power Balls in my fridge to keep me from making bad choices when I. Need. Food. Now! I try not to let that happen, but … life happens!

And these make a wonderful portable breakfast with a hot cup of coffee … one of my favorites!

I’ve dropped the instructions into the graphic itself, to make it easier to save/share on Pinterest, Instagram, etc., and have also posted the full written instructions below in case that’s easier for you. As always, feel free to play around with the ingredients: walnuts are delicious, macadamia nuts … you can substitute some of the dates with dried cranberries for a seasonal sweetness. Enjoy trying new things, and working with what you have on hand.

Chocolate Power Balls Recipe

Delicious and nutritious snack to have on hand for after work or after school. And delicious with coffee!

Chocolate Power Balls

Balls
1/3 c almonds (soaked for 3 hours and drained)
1/3 c pitted soft dates
2 tbs nut butter
1 tbs hemp seeds
1 tsp vanilla
1-2 tsp water or nut milk
1/2 c cacao

Garnish: 4 tbs ground nuts (I like to use hemp seeds and cashews, and if you have a bit of Maldon Salt on hand, crush a bit of that in as well for a salty offset to the sweet cacao!)

Put all ingredients except the cacao into the blender or food processor. Blend or pulse on low until combined. Pour the mixture into a big bowl; stir in the cacao powder.

Roll in to bite-sized balls. If it is too dry you can add more water; if it is too soft add more cacao and/or refrigerate to harden the mixture slightly.

Once all balls have been formed, gently roll each one in to the garnish mixture.

Refrigerate until you are ready to serve, and enjoy!

Filed Under: Breakfast Recipes, Fast Recipes, Healthy Treats Tagged With: cacao, Chocolate

Quinoa Chickpea Bowl – Healthy, Tasty Lunch Idea!

February 14, 2018 by Jennifer Silverberg Leave a Comment

Quinoa Chickpea Bowl

This is a simple make-once, take-all-week healthy lunch choice. Experiment with veggies that are fresh and seasonal!

Hint – make the very fine dice super-easy by using one of my favorite tools, the Vidalia Chop Wizard (and no, I don’t make any money off of it, unfortunately … I just think salads taste so much better when the pieces are evenly diced and you can get a range of different veggies in every bite)!

Ingredients

  • 1 cup quinoa << Click to cart my favorite brand, available at Walmart
  • 2 cups water
  • 1 tsp salt
  • 2 garlic cloves, peeled and crushed
  • 1 tbsp oregano
  • 1 tbsp thyme
  • 1 can of chickpeas, drained
  • 1 carrot, very finely diced
  • 1 large red pepper, very finely diced
  • 1 zucchini, very finely diced
  • 1 medium onion, very finely diced
  • 1 lemon
  • 1/4 cup fresh thinly sliced basil
  • 1 tbsp olive oil
  •  

    Optional:
    Shredded lettuce
    Sliced Avocado
    Freshly ground pepper

    Place the quinoa, water, salt, and 2 garlic cloves into a large saucepan or frying pan over high heat. Bring to a boil, then reduce to a simmer and cover for about 20 minutes, until the water is absorbed and the quinoa is soft and the germ has separated.

    While the quinoa is still hot, add the spices and all vegetables, and cover and heat for about 5 minutes. The veggies will get slightly warm, but will stay crisp.

    Remove all and squeeze lemon and sprinkle with olive oil. Toss in basil and stir.

    Serve immediately, or save and serve this healthy lunch cold over lettuce.

    Filed Under: Healthy Lunch Ideas, Recipes we LOVE, Summer Recipes, Winter Recipes Tagged With: healthy lunch, quinoa

    Savory Sweet Butternut Squash Soup

    February 4, 2018 by Jennifer Silverberg Leave a Comment

    When it’s cold and wet outside (like today), I want comfort food with a kick … and this Butternut Squash soup, with its sweet and spicy flavor profile is really perfect. A light salad with a tarragon vinegar and oil dressing makes a perfect companion, clearing your palate and letting you rediscover the creamy warmth again and again.

    And fair warning – it’s a “little” addictive … so it’s good that it’s super-simple to make.

    Butternut Squash Soup - Eat Yourself Well

    All the best flavors – sweet and spicy – in a creamy, delicious, healthy soup!


    The Amazing Savory Sweet Butternut Squash Soup

    -1 tbsp. coconut oil (Click here to cart my favorite!)
    -2 shallots
    -2 cloves garlic
    -1 butternut squash, peeled and cut into chunks (5-6 c.)
    -1 1/2 tbsp curry powder
    -1/2 tsp. cinnamon
    -salt and pepper
    -1 can (14 oz) coconut milk
    -2 c. vegetable broth
    -2 tbsp maple syrup
    -1 tsp. sriracha (or dry chili spice)


    Click above to add these ingredients to your Walmart cart, or click here to choose other stores!

    Choose your Favorite Retailer to Cart the Ingredients


    1. Heat the oil over medium heat; once warm add the shallots and garlic (finely chopped) and sauté until light brown.
    2. Add the squash and spices, stirring frequently over the next four minutes.
    3. Cover and simmer over low heat (until squash is tender).
    4. Blend with immersion blender, add more spices as needed over the next few minutes of simmering (just for a few minutes after blending it all together), then serve with desired garnishes. Pictured here with parsley and pepitas (crunchy texture is awesome to offset the creaminess!). Also very tasty with a bit of candied nuts.

    Filed Under: Fast Recipes, Gluten-Free, Healthy Lunch Ideas, Recipes we LOVE, Seasonal Eating, Superfoods, Winter Recipes Tagged With: butternut squash, lunch, soup

    “Embrace the Chaos” Berry Crumble

    January 27, 2018 by Jennifer Silverberg 1 Comment

    If you’re looking for the picture-perfect, wins-the-county-fair-beauty-contest pie, keep looking, this is not it. But if you’re looking for amazing flavor from super-healthy ingredients … that is also kind of hippy-dippy perfect in a wabi-sabi way, you’re going to love this Berry Crumble recipe!

    This weeknight-friendly (fast and easy!) special treat can be pulled together with whatever berries/fruit you have on hand – blueberries, blackberries, strawberries, cherries, boysenberries, etc. … and frozen is a great stand-in when fresh berries aren’t available.

    I also recently served this as a side dish with an otherwise super-savory breakfast over the holidays, and it was a big hit.

    eatyourselfwell_berrypic

    Eat Yourself Well Berry Crumble Chaos


    “Embrace the Chaos” Berry Crumble

    Ingredients:

    (filling) 5 c. fresh or frozen berries – whatever is in season or you have on hand (I love mixing cherries and berries as well!)
    2 tbs. lemon juice
    2 tbs arrowroot powder
    pinch of salt

    (crust) 1/2 c. coconut milk
    1 tsp. each vanilla + apple cider vinegar
    1 1/2 c. oat flour
    1 tbs. baking powder
    1/4 c. coconut sugar
    pinch of salt
    3 tbs applesauce
    2 tbs nut butter

    (topping) cinnamon, turmeric

    Click the logo to below cart the recipe, or click here to see all store options.

    1. Preheat the oven to 425 F. Use a pan that is roughly 8×8; line with parchment paper unless it is nonstick.

    2. Combine + mix all of the filling ingredients. pour into the pan, cover, and bake for 30 minutes.

    3. Stir together the coconut milk and apple cider vinegar. After a few minutes (for it to curdle) add the vanilla

    4. Combine the dry ingredients (flour, powder, sugar, salt) in a large bowl.

    5. In another small container, mix the applesauce and nut butter well. Once combined, add it to the dry ingredients until the mixture is crumbly. Then gently stir in the coconut milk until just combined.

    6. Once the filling is finished cooking, take it out of the oven and reduce the heat to 350 F. Spread the crust over the berry mixture and top with dashes of cinnamon and turmeric (I like a kind of freeform tie-dye look). Cook for 25 more minutes.

    7. Remove from the oven to cool; serve it warm.

    (Some call this a berry cobbler, others a berry crumble, or a berry pie – whatever you call it, call me to the table when you make it!)

    Filed Under: Healthy Snacks, Healthy Treats, Recipes we LOVE Tagged With: Berry Crumble

    Warming Lentil Soup

    October 29, 2017 by Jennifer Silverberg 1 Comment

    I love lentil soup almost any time, but I think it’s the tastiest in October/November as we watch the leaves turn! The following variation is a favorite, and serves as a great base to add almost any other veggies you have on hand – celery, carrots, caulflower, etc. are perfect. You can also serve this over rice to make a complete protein, and to stretch it a bit – if you’re doing that, you can also add more tomatoes to extend the sauce.

    Warming Lentil Soup Recipe

    Warm Spicy Lentil Soup
    Serves 4 (or two really hungry people!)

    2 C dry green lentils
    1 medium onion
    3 cloves of garlic
    4 cups vegetable broth and 2 cups of water
    few tbs olive oil
    Hunk of stale bread (equivalent to 2-3 slices)
    1 tsp of sweet paprika paste (comes in a tube), or 1/2 tsp. paprika
    1 tsp mitmita blend for spice/heat (this is available at ethic groceries or online – or you can make your own mix of ground chili peppers, cardamom seed, cloves, and salt – can also make it more “warming” by adding a bit of cinnamon, cumin, and ginger)
    15 oz can diced tomatoes
    1 tsp salt
    parsley garnish (optional)

    Peel onion and cut it in half. Dice one half and set aside for later. Cut the other half into rough chunks and put in the pot with 3 smashed garlic cloves, rinsed lentils, and the 6 cups of liquid (mixed broth and water). Bring to a boil then reduce to a simmer for 30-40 min (until lentils are tender).

    When lentils are almost ready, crisp up the bread in a separate pan in the olive oil. Remove the bread from the pan (push any crumbs to the side) and sauté the diced onions for a few minutes. Add paprika/spice and cook for 30 sec., then add tomatoes. Cook for about 10 minutes.

    Chop the bread into small bits. Add the bread and the tomato mixture to the soup, stir and cook for a few minutes, taste and add salt/pepper as needed, garnish with parsley and serve! Add more water if the lentils have absorbed most of it.

    Note: I actually like to keep my bread in bigger chunks because I like getting chunks of bread in soup, but it is more common to finely chop or ground the bread.

    Filed Under: Recipes we LOVE, Winter Recipes Tagged With: lentil soup, warming soup, winter soup

    • 1
    • 2
    • 3
    • …
    • 8
    • Next Page »

    Are you ready to…

    Lets get social


    Want more? Follow us on social media.

    Take a look around

    Favorite Posts

    Recent Posts

    • COVID Has Reminded Us: Health REALLY Matters
    • Amazing and Easy Banana Bread
    • Healthy Resolution!
    • Happy Healthy Christmas Salad!
    • Quick Comfort Food: Grits and Greens (Plant Based!)

    Popular Posts

    101 Fast/Healthy/Fabulous Snack Ideas

    Copyright © 2025 · Foodie Child Theme by Shay Bocks · Built on the Genesis Framework · Powered by WordPress