EAT YOURSELF WELL

Inspiration | Information | Recipes

  • Home
  • About
  • Recipes
  • Wellness Retreats
  • Sites We Love
  • Shop
  • Inspiration

Easy Roast Veggie Polenta

February 18, 2015 by Jennifer Silverberg Leave a Comment

Roast Veggie Polenta

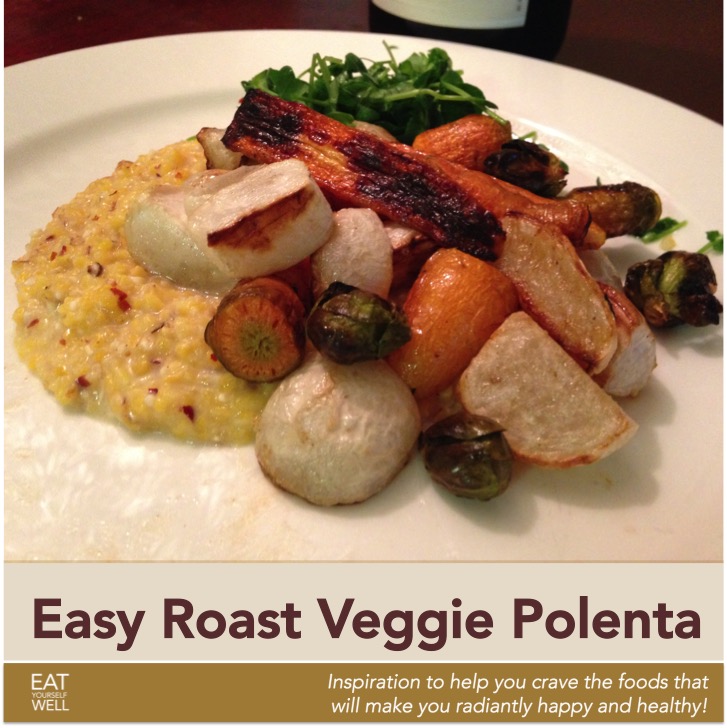
I like this dish super-simple, to let the natural flavors of the polenta and winter vegetables shine. If you want to fancy it up a bit, feel free to add a splash of balsamic vinegar at the end, or add just about any fresh spices you have on hand to the veggies, midway through cooking.

Serves 2

Polenta
1 cup organic (non-GMO) polenta
5 cups water or homemade vegetable broth
1 tbsp coconut oil
2″ x 2″ square of fresh parmesan cheese (optional – omit for vegan version)
1 tsp sea salt

Vegetables
About 8 fresh small turnips (about the size of a large radish), trimmed and quartered
About 16 small carrots (the kind sold in a bunch) – Washed, and if they are any bigger than your finger, slice them lengthwise
10 – 15 brussels sprouts
2 tbsp olive oil
Kosher/sea salt to taste
Microgreens/sprouts as garnish, to add texture, flavor, and nutrition!

Note: I give these instructions in two steps because I have only one oven, and can’t cook the polenta and veggies at the same time. If you have two ovens, feel free to do both steps below at once!

First, start the polenta. Then, while it’s cooking, prep the veggies, and later add them to the oven.

Preheat oven to 375. This is the easy way to cook polenta – very little stirring! Measure the polenta, salt, coconut oil and water/broth into an oven-ready saucepan and stir. Place the saucepan in the preheated oven, and stir about every 10-15 minutes until the polenta is done (about 40 minutes). After the polenta has been removed from the oven, stir in the parmesan cheese, and keep the polenta warm over very low heat.

Meanwhile, prep the vegetables, then toss them in the olive oil and sprinkle with salt. Put on a bake sheet in a single layer (really important – if they are overcrowded or overlap at all, they will steam and be mushy, rather than deliciously brown and crispy!). When the polenta is ready, pop the veggies in the oven and turn up the heat to 400 (425 if your oven runs a little cool). Roast, stirring occasionally, for about 30 minutes, or until vegetables are browned like in the picture above.

Plate the dish by placing the roast veggies over the polenta, adding the greens next to or over both. Add fresh ground pepper over all and serve.

Filed Under: Recipes we LOVE, Winter Recipes Tagged With: easy winter recipe, polenta, roast veggie polenta

Weekday Sweet Potato Quinoa Salad

February 9, 2015 by Jennifer Silverberg Leave a Comment

Weekday Sweet Potato Quinoa Salad

This is one of my very favorite recipes, because it’s endlessly variable. Add coriander with the cumin. Top with that leftover salsa. Slip in some spinach … and on and on. But I digress … here is the basic recipe!

Makes Two Meals

1 cup raw quinoa – any type
1 large or 2 medium (about 1 pound) sweet potatoes, scrubbed clean
1 tbsp cumin
splash of olive oil (doesn’t have to be extra virgin – you’re cooking with it)
—————-
1/4 cup raisins or dried cranberries
About 2 cups (or more) of arugula
1 green onion, sliced
—————-
1/4 cup tablespoons balsamic, sherry, or red wine vinegar
1 tsp dijon mustard
pinch of salt
Freshly ground black pepper
1/4 cup extra virgin olive oil

Optional: Avocado, pepitas, lime juice, walnuts, diced bell peppers, or anything else you have on hand!

Preheat oven to 425.

Slice the sweet potato into small squares (no need to peel first). Toss in just a small bit of olive oil, the cumin, and salt, put in single layer on cookie sheet (or similar) and put in oven for about 25 minutes or until brown. Stir once or twice so that they brown evenly.

In the meantime, rinse quinoa, place in saucepan and add 2 cups of water. Bring to a boil, reduce heat to low, cover and simmer until tender and most of the liquid has been absorbed, 15 to 20 minutes.

While they are cooking, put the raisins/cranberries, arugula and green onion into a bowl, and sprinkle with the vinegar, mustard, and salt, then toss to coat (yes, you can just toss it all in there and stir it around). Let sit for a few minutes, then add pepper and olive oil and stir it around again. Add any optional items you would like.

When it’s all ready, plate the salad, spoon some quinoa over it, and toss on the crispy, delicious, hot sweet potato.

And have fun with this … have some fresh herbs on hand? Toss ’em in. Like garlic in your dressing? Toss it in. Don’t have raisins but have apples? Go with that. Enjoy!

Filed Under: Fast Recipes, Recipes we LOVE, Winter Recipes Tagged With: quinoa salad, sweet potato, weekday salad

Poached Purple Cauliflower (White Works, too!)

December 18, 2014 by Jennifer Silverberg Leave a Comment

Poached Purple Cauliflower

This is dazzlingly beautiful with purple cauliflower from your local farmer’s market or grocery, but works just as well with the more common white cauliflower. With purple, the color darkens and intensifies as it’s cooked, and it serves as a beautiful contrast to potatoes, pasta, or other light-colored foods. Enjoy!

Ingredients
1 cup white wine
1 cup water
1/4 cup olive oil
3-4 tsp kosher or sea salt
3-4 tablespoons fresh lemon juice
1 bay leaf
1 head of cauliflower, leaves and a bit of the core carefully removed (not so much that the head falls apart!); purple is amazing for presentation, but white works just as well!

Mix all ingredients other than cauliflower at the bottom of a large, heavy-bottomed pot that is large enough to hold the cauliflower and still be covered. Place the cauliflower on the top, cover (use aluminum foil if you don’t have a lid for your pot) and bring to a boil. Reduce heat and simmer, covered, until a knife easily inserts into center, about 15-20 minutes.

Using 2 spatulas, spoons or a mesh spider, transfer cauliflower to a plate, draining well.

Purple cauliflower can be served immediately; white cauliflower presents better if you drizzle with a little olive oil and then broil for a few minutes to lightly brown the top. Great with freshly ground pepper over all. Enjoy!

Filed Under: Recipes we LOVE Tagged With: cauliflower, healthy cauliflower, poached cauliflower, purple cauliflower

Bold Winter Greens Salad

December 6, 2014 by Jennifer Silverberg Leave a Comment

Bold Winter Greens Salad

Bold Winter Greens Salad

This bold winter salad pairs well with hearty but simple winter soups like white bean, or veggie chilis. I usually find myself going back for second and third helpings – and it actually holds well in the fridge as well – so I make a LOT of this salad at a time.

Dressing:
1/3 C tablespoons olive oil
1/4 C tablespoons white balsamic vinegar
1 tablespoon raw honey (or regular if raw is not available)
1 tablespoon oregano, dried
1 teaspoon Dijon mustard
1 clove garlic, minced
1/2 teaspoon salt
1/4 teaspoon freshly ground black peppercorns

Vegetables/Fruits:
4 – 6 collard leaves, trimmed and finely chopped
1 bunch kale, with stems removed, then rolled (like a cigar) and thinly sliced into ribbons
1 head romaine lettuce, diced
1/4 small head red cabbage, diced
Optional: other winter greens, like escarole, chicory, or endive, sliced
1 apple, cored and thinly sliced – no need to peel
1/2 yellow onion, finely diced
1/2 orange bell pepper, diced
1 avocado – peeled, pitted, and diced
1 large carrot, sliced horizontally using vegetable peeler
Optional: walnuts, crushed

Directions

Mix all dressing ingredients in a mason jar or similar, shake well, and sit aside to let flavors blend. Salt can be reduced a bit if needed, but not eliminated entirely, or the ingredients will not mix properly.

Chop all vegetables per ingredient instructions. This salad is MUCH better if the thicker greens, like collard and kale, are properly prepared by being thinly sliced!

Place all veggies in a large bowl, and toss with about half of the dressing. Let sit for at least 15 minutes, and then serve with remaining dressing added to taste. Top with walnuts, if desired.

Filed Under: Healthy Lifestyle, Recipes we LOVE, Superfoods, Winter Recipes

Baked Apple Winter Breakfast

November 24, 2014 by Jennifer Silverberg Leave a Comment

Winter Breakfast ApplesEven if you’re bleary-eyed and shivering in the cold this AM, you can put together this super-simple but oddly hearty winter breakfast!

Ingredients

1 apple per person (or make that 1.5 to be safe :-)) I love organic Fuji apples, but pretty much any apple will do.
Finely chopped nuts: I love walnuts and macadamia for this, but whatever you have will work (to easily chop, whirl them in the blender for a sec)
About 1/4 tsp coconut oil per apple
Cinnamon, to taste (you’ll want more than you think)
Cloves (prefer whole, but if you only have ground, that will work too)
About 1/4 cup Coconut water or plain water

Recipe

Preheat oven to 400 degrees.
Using a small paring knife, cut out the top part of the core of the apple, basically in a funnel shape.

Sprinkle cinnamon into the funnel, then fill in with the finely chopped nuts. Drop the coconut oil on top.

Pour the coconut water into the base of the pan, put the cloves into the pan, then put the apple(s) on top of them.

Pop them in the oven, get back in bed under the warm covers for about 40 minutes.

They’re ready when they yield to a quick squeeze or can be pierced with a fork. I like them a little less done, so the apple keeps the bite – up to you. There will be a delicious liquid in the bottom of the pan – you may want to pour it over each baked apple just before serving!

Note: You can even use nut butters, like almond butter, for this one, if you don’t have nuts on hand!!

Filed Under: Recipes we LOVE Tagged With: baked apple, baked apples, easy breakfast, easy hot breakfast, winter breakfast

Healthy Pumpkin Pie, Baked in the Shell

October 13, 2014 by Jennifer Silverberg 2 Comments

Pumpkin Pie Baked in the Pumpkin

Fresh Pumpkin Pie SliceOk, now THIS was a fun one to figure out! I wanted a fully REAL food pumpkin pie – nothing processed. And I wanted to bake it in the shell. And I wanted it to be fairly easy. Here you go: simple, healthy, and beautiful!

If you’re thinking of making this for Thanksgiving, you may want to make it once or twice ahead of time, too. Not because it’s tricky or anything, just because it’s delicious :-).

Ingredients
2 medium “Sugar Pumpkins” – these are NOT jack o’lantern pumpkins, they’re quite different. Look for ones marked “sugar pumpkins” or “baking pumpkins.”
1/2 cup maple syrup
3-4 tbsp “pumpkin pie spice” (or mix of cinnamon, nutmeg, ginger, cloves and allspice)
1 tsp salt
1.5 cup raw cashews
1 tablespoon vanilla
I also like to add some freshly ground nutmeg and a little fresh ginger if I have it on hand
Pepitas for garnish
Optional: 1/4 cup marscapone cheese – makes the pie super-creamy, but omit for vegan version
Optional: 2 eggs – they’re not needed, but some people prefer the texture of eggy pumpkin pie

How to make

Preheat oven to 350.

Cut the tops off of both pumpkins, and cut one in to halves, leaving the other whole. With a spoon, scrape out the seeds and other tissues and put aside (you can roast the seeds later if you like).

Pumpkin pieces ready to roastMix the maple syrup, spices, and salt, and pour into the “bowls” of the halves and the whole pumpkin, and spread around the inside surface. Place these on a large baking sheet and lay a piece of aluminum foil over all. Place into the oven – they are going to cook about 30 – 50 minutes (totally depends on the pumpkins, they can vary considerably), until softened but the shell of the large pumpkin is still solid (not collapsed).

Remove the pumpkins to cool. Put the cashews, a little water and vanilla in a high speed blender (like Vitamix) or food processor. Note: If you do not have a high speed blender, simmer the cashews in water for about 15 minutes, then discard the water before processing) Process until smooth, adding a little water as needed to make smooth. If you are using marscapone cheese and/or eggs, add them now.

When the pumpkin pieces are cool enough, pick them up and pour the remaining maple syrup/spices from them directly into the cashew mix and continue blending on low. Then, scrape the soft pumpkin pulp from the pumpkin halves, all the way to the skin (discarding skin), and add to the blender (still on low). Last, scrape about half of the pumpkin pulp from the whole pumpkin, leaving enough to preserve the structure, and also add this to the blender. Process until smooth. Note: you may overflow your blender, and have to blend in stages.

Taste the pumpkin mixture (assuming you haven’t added eggs) and adjust seasonings – I usually wind up adding some more spices at this point.

Pumpkin ready to go back into the oven

Pumpkin ready to go back into the oven. Note that the filling will expand a bit, so expect it to overflow if you fill to the edge.

When the filling is ready, slowly pour it back into the whole pumpkin, and put the “pie” back in the oven to bake for another 40 – 50 minutes or so, until the top is browned and the filling seems to be set. Remove, and let cool to room temperature, or place in the refrigerator to serve later (most people prefer pumpkin pie to be chilled).

I like to serve this topped with a little more cashew cream or marscapone, blended with a bit of maple syrup, plus a sprinkling of toasted pumpkin seeds. Slice from top to bottom and put slices flat onto plates, then top with the cashew cream or marscapone. Beautiful and delicious – Enjoy!!!

Filed Under: Holiday Cooking, Recipes we LOVE, Seasonal Eating, Superfoods, Winter Recipes Tagged With: healthy pumpkin pie, pumpkin pie baked in the shell, pumpkin pie from scratch, vegan pumpkin pie, vegan thanksgiving

Easy Eggplant Dip

October 9, 2014 by Jennifer Silverberg Leave a Comment

When I have an eggplant around and am using the oven at night, I’ll sometimes cut the eggplant in half, spread on a little olive oil and salt, toss it in the oven to roast (about 40 minutes, at about any temp), and then pop it into the fridge to cool overnight. The next day, it’s super-easy to scoop out the roasted eggplant and whirl it in a blender with the other ingredients below – in under 5 minutes, I have a tasty, healthy, creamy lunchtime addition to salads, veggies, sandwiches, pasta, etc.! Bonus: even people who say they hate eggplant love this … just don’t tell them what it is!

Easy Eggplant Dip

Filed Under: Healthy Lunch Ideas, Recipes we LOVE

Eat Your Greens Sandwich!

October 9, 2014 by Jennifer Silverberg 1 Comment

This is basically an amazing salad on bread – a portable salad, and a super-tasty way to eat your greens! And the way the hummus combines with the greens … SO yummy!

Eat Your Greens Sandwich

Filed Under: Recipes we LOVE Tagged With: eat your greens, healthy sandwich

Real Food Challenge: Kilospire’s Yellow Curry Stir-Fry

September 24, 2014 by Jennifer Silverberg Leave a Comment

Kilospire Yellow Curry Stir-FryKilospire (super-cool blog run by my good friend, health and wellness researcher and life hacker Trevor Parks, and nutritionist, personal trainer, and triathlon coach Denise Whitson) has joined Eat Yourself Well for the REAL FOOD CHALLENGE, and has posted a great recipe that makes about 16 servings for about $20 – feeing a HUGE family, and/or lasting for multiple meals throughout the week!

Ingredients are posted below (I make it without the chicken, but that’s up to you). The full recipe is at the Kilospire Blog

1/2 of 14 oz. tub of Mae Ploy Thai Yellow Curry paste
3 13.5 oz cans coconut milk
2 lbs. boneless chicken breasts (we like Tyson)
5 medium sized potatoes
1 lb. carrots
1 medium sized onion
1 green pepper
2 lbs. white or brown rice
About $20 bucks. Shop smart!


Cart with one click


Or shop the recipe…


Again, find the full recipe at the Kilospire Blog

Filed Under: Real Food Challenge, Winter Recipes Tagged With: Real Food Challenge, yellow curry healthy, yellow curry stirfry

Simple lunch: Pita with Hummus + Sprouts

September 24, 2014 by Jennifer Silverberg Leave a Comment

Pita with Hummus and Sprouts

I thought I’d share my version of yesterday’s Food Challenge lunch … which was a little bit of a riff on the recipe for the day. When I went shopping to get wraps, the store had handmade whole wheat pita for half off, so I bought those instead; on this budget you get creative with what’s on sale, for sure!

And, since I keep sprouts growing on my windowsill, I tossed those in for extra flavor, crunch, nutrition, and beauty. It was SO simple and delicious – I will do this again and again anytime I need to grab a quick, simple lunch that’s also healthy!

Ingredients
Gluten-free or Whole Wheat Pita
Organic Hummus (homemade or store-bought, any type)
Sunflower sprouts (or any other greens or veggies you have on hand)
Turmeric
Black pepper

Instructions

Cut the pita in half and spread hummus on both inside surfaces. Toss sprouts into the pocket, sprinkle with turmeric and black pepper (or any other spices you like), and eat!

Would REALLY like to hear from you – how is your challenge going?

Filed Under: Fast Recipes, Food Choices, Healthy Snacks, Real Food Challenge, Recipes we LOVE Tagged With: Eat Yourself Well Real Food Challenge, hummus pita, Real Food Challenge

  • « Previous Page
  • 1
  • 2
  • 3
  • 4
  • 5
  • …
  • 8
  • Next Page »

Are you ready to…

Lets get social


Want more? Follow us on social media.

Take a look around

Favorite Posts

Recent Posts

  • COVID Has Reminded Us: Health REALLY Matters
  • Amazing and Easy Banana Bread
  • Healthy Resolution!
  • Happy Healthy Christmas Salad!
  • Quick Comfort Food: Grits and Greens (Plant Based!)

Popular Posts

101 Fast/Healthy/Fabulous Snack Ideas

Copyright © 2025 · Foodie Child Theme by Shay Bocks · Built on the Genesis Framework · Powered by WordPress