EAT YOURSELF WELL

Inspiration | Information | Recipes

  • Home
  • About
  • Recipes
  • Wellness Retreats
  • Sites We Love
  • Shop
  • Inspiration

Open Faced Egg Sandwich, with Arugula-Basil Pesto

July 27, 2014 by Jennifer Silverberg Leave a Comment

Open Faced Egg Sandwich with Arugula Pesto - Eat Yourself Well

Ingredients:

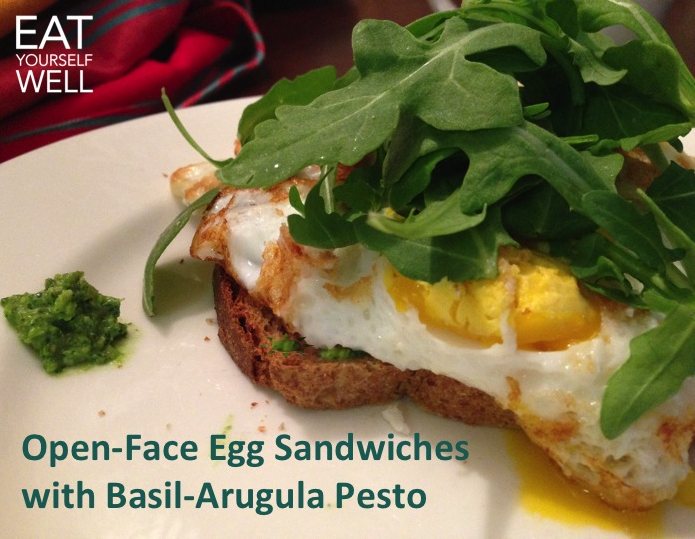
For each open-faced egg sandwich:

  • One slice bread
  • Two eggs fried in olive oil (done to your preference)
  • One slice homemade or farmer’s market honey wheat bread (or any bread, but the honey wheat combines nicely with the pesto)
  • 2-3 tbsp Arugula Basil Pesto (recipe below)
  • 1/4 cup arugula
  • Prepare Arugula Basil Pesto – recipe below. Make the full recipe even if you won’t use it all now – it is great on pasta, salads, and roast vegetables too! You can also freeze it in cubes for later!

    Directions

    Put bread in toaster.
    Fry two eggs in coconut oil.
    When toast is ready, add 2-3 tbsp (or to taste) of the Pesto. When eggs are ready, place them over the pesto, then sprinkle with arugula. Serve immediately, preferably with wonderful coffee!

    Arugula Basil Pesto

    2/3 cup raw almonds (you can also use pine nuts, but I prefer almonds as they are higher protein)
    1 cups fresh basil leaves
    3 cups fresh arugula
    3 cloves fresh garlic
    1/2 cup extra virgin olive oil
    1 tbsp freshly squeezed lemon juice
    Optional: 1/2 cup fresh parmesan, grated
    salt, to taste
    pepper, to taste

    Toast almonds on medium-high heat for about 3-4 minutes, or until they are warmed and just slightly fragrant. Let cool a few minutes.

    Place almonds, basil, garlic, lemon juice, salt, and pepper into a food processor and pulse until well blended. With the blender still going, add in the olive oil and blend until smooth, scraping the sides as needed. You may want more or less olive oil – taste and adjust if you like.

    Use immediately or store in the fridge in an air tight container for a few days.

    From Jennifer Silverberg at www.EatYourselfWell.com and facebook.com/eatyourselfwell Please maintain link as you copy and share recipe with others!

    Filed Under: Breakfast Recipes, Recipes we LOVE Tagged With: arugula basil pesto, eat yourself well, egg sandwich, garlic and eggs, recipe

    Good Morning Groats Recipe!

    July 24, 2014 by Jennifer Silverberg 1 Comment

    Groats Recipe - Eat Yourself Well

    Nothing is better than waking up to a hot, delicious breakfast that is already cooked. Start these groats in the evening, and that’s exactly what you’ll have when you wake up on a cold morning!

    Groats have a delightful chewy texture, are extremely high in fiber, and also high in zinc (great for cold season), bioavailable iron, selenium and vitamin E, among other nutrients. If your grocer doesn’t carry them, they’re easy to find online, at Amazon and other sites.

    Pressure-Cooker (fast and simple)
    Put two cups of groats with 6 cups of liquid (water, or a mix of water and coconut water or milk, apple juice, green tea, or just about any other liquid you like) into your pressure cooker. Allow to come to medium pressure and cook for 15 minutes. Add any add-ins you like, below, and serve!

    Slow-Cooker (like the universe making you breakfast in bed)!

    For easy cleanup, lightly grease the slow cooker with coconut oil. Add 6.5 cups of liquid (water, or a mix of water and coconut water or milk, apple juice, green tea, or just about any other liquid you like) to two cups of groats in the slow cooker. Put the slow cooker on low heat and cook for 8 hours. Stir, add any add-ins you like, and serve!

    Add-Ins (This is where it gets REALLY fun) – pretty much whatever is in season!
    Apples (chopped)
    Raisins
    Almonds (whole or chopped)
    Peaches
    Bananas
    Coconut Flakes
    Cranberries (dried or fresh, chopped)
    Vanilla
    Cinnamon
    Berries: blue, black, straw, etc.
    Walnuts
    Hemp Seeds
    Goji Berries
    Chia Seeds
    (You get the idea – whatever you like!)

    Note: Though oats do not contain gluten, they are frequently processed in the same factory and can be contaminated. If you are sensitive to gluten, choose groats that say “gluten-free.”

    Filed Under: Breakfast Recipes, Recipes we LOVE, Techniques, Winter Recipes Tagged With: eat yourself well, groats, healthy breakfast, recipe

    Colorful Roast Spring Squash – a great way to celebrate the colors of Spring!

    May 25, 2014 by Jennifer Silverberg Leave a Comment

    Colorful Roast Spring SquashThis one takes a little work to assemble (:-) you’ve been forewarned), but is a fun project with kids and is REALLY pretty on the table. I actually like the non-casserole version better when served piping hot, but plenty of people disagree with me (and the casserole is crazy delicious when served cold) so here you go with both versions!

    Ingredients
    4 medium carrots
    Spring zucchini and yellow squash – amount depends on size. I like the smaller spring versions, and buy about 20 of those, but if you have larger ones, the quantity is lower.
    4 fresh garlic cloves, finely chopped or pressed
    3/4 cup mushrooms, chopped, pick your favorite type
    1.5 tbsp fresh thyme (I love lemon thyme in this, if you have it)
    1 tbsp olive or coconut oil
    Salt and pepper to taste

    Additional for casserole version:
    4 eggs
    1/4 cup chopped parsley
    1/4 cup milk (any type, and optional)
    1/2 cup cheese (optional)

    Preheat oven to 350.

    Slice carrots into thick matchsticks or similar small pieces, about 2″ tall. Warm oil in oven-safe casserole dish (about pie-pan size) over medium heat. Add garlic, mushrooms, carrots, and 1 tbsp of the thyme. Cook slowly for about 10-15 minutes, stirring occasionally, until carrots are warmed throughout, then remove carrots and spread them out to cool, leaving the mushrooms and garlic in the pan.

    While the carrots are cooking and cooling, cut the zucchini into similar large matchstick pieces.

    Now, the fun begins. Spread the mushroom mixture across the pan, and begin arranging the matchsticks upright over them. Kids love helping with this, it’s a game. I find it easier to start in the middle and move outward. If you’re feeling creative, make a pattern, like a flower, with the colors. Go all the way to the edges so that the pieces stay upright while baking. If you’re not making the casserole version, sprinkle the remaining thyme over the vegetables, add salt and pepper, and pop into the oven for about 20 minutes, or until veggies are soft but not mushy (use a fork to gauge readiness).

    Casserole variation: before putting the veggies in the oven, whirl the eggs, plus the cheese and milk if you’re using them, in your blender on low, along with pinch of salt. Stir in the parsley, and pour evenly over the vegetables. Grind pepper over all. Bake until the eggs are set, and the vegetables are soft but not mushy – you can tell by using a fork. Let rest about 10 minutes before eating. This dish is also excellent served cold!

    Filed Under: Fast Recipes, Recipes we LOVE, Uncategorized Tagged With: recipe, roast, spring, squash, zucchini

    Ridiculously Good/Easy/Healthy Granola Bits

    June 9, 2013 by Jennifer Silverberg Leave a Comment

    This is not a fussy recipe – feel free to experiment and learn what you love the most – it will ALL be good.  For example, I used freeze-dried pomegranates in the last batch and they added a great sweetness and an unexpected extra crunch.  If you have a favorite nut butter, you can add it instead of – or in addition to – the nuts. Think about seasonal flavors as well!

    This is also a great recipe to make with kids – they can use their (clean) hands to mix.

    Ridiculously Good/Easy/Healthy Granola Bits from EatYourselfWell.com

     Ridiculously Good/Easy/Healthy Granola Bits

    • About 4 cups grains; oat flakes, barley flakes, wheat flakes, rye flakes or similar 
    • 2 handfuls of seeds; for example, sunflower,  hemp, chia, pumpkin.
    • 2 cups nuts;  for example, almonds, walnuts, pecans, etc.
    • ½ cup coconut flakes, unsweetened
    • 1/2 cup coconut oil, melted
    • 1/3 -1/2 cup sweetener: maple syrup, honey, agave, or brown sugar
    • Optional: 1 cup dried or freeze-dried fruit; for example,  cranberries, apple, strawberries, banana, raisins, plums
    • Optional (but delicious!):  handful of cacao nibs
    • Optional: Spices of your choice: cinnamon, vanilla, etc.

    Preheat your oven to 300 degrees.

    Place the nuts, seeds, grains, coconut and dried fruits (if using) into the bowl of a food processor and pulse to break up and mix.  (Do not over-process, or you’ll wind up with nut butter!)  Move to a large bowl.  Mix the melted oil and sweetener (and spices, if using) in a smaller bowl, then add to the big bowl and toss really well with a big wooden spoon – or a couple of kid hands plus your own.  

    Form into spoonful-sized bits and place onto a large, parchment-lined baking sheet.   Tap them down to flatten slightly. Bake for about 40 minutes, but watch carefully for the last 10 minutes or so, and take out when they look lightly browned and feel firm.

    Store it in an airtight container for up to three weeks (at least, I think so … it never lasts that long for me). 

    From  Jennifer Silverberg at www.EatYourselfWell.com and facebook.com/eatyourselfwell  Please maintain link as you copy and share recipe with others!

    Filed Under: Cooking Tips, Fast Recipes, Kids and Food, Recipes we LOVE, Uncategorized Tagged With: bits, easy, granola, healthy, recipe

    February 28 is National Chili Day – Here’s a Great Recipe to Celebrate!

    February 27, 2013 by Jennifer Silverberg Leave a Comment

    kidney_beansParts of the country are getting blasted with late-winter snowstorms, making this a GREAT time for chili – just in time for National Chili Day!

    There’s really no wrong way to make chili, other than opening a can full of who-knows-what ingredients. If you’re missing anything below, feel free to experiment with something similar …. the recipe will probably still turn out fine.  And if you’re trying to minimize the prep work, feel free to sub in Hooray Puree packets as noted below.

    • 1 tbsp olive oil
    • 1 cup diced onions
    • A couple of carrots, chopped, or one packet of Hooray Puree Carrot
    • 1/2 butternut squash, diced, or 1 packet of Hooray Puree Butternut Squash
    • 3-4 cloves garlic, minced
    • 2 chopped bell peppers – green, yellow, or red
    • about 1 cup chopped celery 
    • 1 tbsp chili powder 
    • 1 28-oz can whole peeled tomatoes with liquid, chopped
    • 1 (19 ounce) can kidney beans with liquid
    • 1 tbsp ground cumin
    • 1 tsp salt
    • 1 Tsp dried oregano
    • Chopped cilantro, red onion, jalapeños, green onions, or anything else that sounds good to you!

    Heat oil in a large pan (not cast iron, or it will react with the tomatoes) over medium heat. Saute onions, carrots, butternut squash (if you’re using puree, wait until you add the tomatoes), and garlic until tender. Stir in green pepper, red pepper, celery, and chili powder. Cook about 5-6 minutes, until vegetables begin to soften.

    Add tomatoes and kidney beans and stir well. If you’re using purees for the butternut squash or carrots, add that now.  Season with cumin, oregano, and salt. (If you’re feeling adventurous, add a little cinnamon and/or dark chocolate to bring out a big, deep flavor.)  Bring to a boil, and reduce heat to medium. Cover and simmer for 20 minutes, stirring occasionally.

    Serve with chopped cilantro, red onion, jalapeños, or anything else that sounds good to you!

    eatyourselfwell.com

    Filed Under: Cooking Tips, Fast Recipes, Kids and Food, Recipes we LOVE, Techniques Tagged With: National Chili Day, recipe

    No Time/No Money? No more excuses!

    February 25, 2013 by Jennifer Silverberg 1 Comment

    The most common reasons people give me (and in honesty, the most common excuses I try to give myself) for making bad food choices are “no time” and “no money.”

    Where did we get the idea that healthy food has to be expensive and time-consuming?  Sure, organic food costs a little more (and I have a post on that one coming soon), and it’s always going to be hard to beat the SHORT-TERM costs of uber-subsidized, hyper-processed fast food nastiness … but tasty, healthy meals can be made in minutes.

    Following are a few foods to keep on hand so that when you’re out of time and out of money, you can still make something super-delicious in minutes … buy in bulk when they’re on sale!  And at the end, I’ve thrown in a quick recipe I invented tonight, when I got in late after a 3-state day (lots of travel!) and couldn’t face the grocery store!

    • Canned Beans of any type, like black beans, kidney beans, white beans, lentils, whatever (but buy ones with no BPA in the cans)!:  Added to just about any veggies, create filling, healthy meals in minutes
    • Canned Tomatoes (again, no BPA)
    • Frozen Veggies:  Broccoli, green beans, peas, carrots – whatever you like.  Just don’t get the ones with sauces and seasonings added – you’re going to do that yourself, with healthy ingredients!
    • Raw Almonds:  A meal in itself when you truly have no time … and delicious crushed over salads, etc.
    • Quinoa:  quick-cooking deliciousness that meshes with just about any flavor, sweet or savory
    • Olive Oil:  But of course!
    • Spices: Start with a good set of the basics, and keep adding new ones when you see them.  Go online to find recipes for them, or stir-fry some of those veggies in the freezer and just toss in the spices to see what happens!

    broccoli

    Turmeric-Garlic Broccoli & Chickpea Saute with Crisp Red Pepper Strips

    Tonight when I got home, I knew I was short on veggie servings for the day, I didn’t want to load up with too much food because it was late, but (as always), I was unwilling to sacrifice taste or texture!  So, I grabbed what I had on hand:

    • 1 Bag frozen organic broccoli
    • 1 garlic clove, crushed
    • dash of olive oil
    • 1/2 can organic chickpeas, drained
    • pinch of salt
    • 1 tbsp turmeric
    • 1/2 medium red pepper, cut in strips

    Put about 2 Tbsp of water, a dash of olive oil, and the crushed garlic into a pan, and add the bag of frozen broccoli (mine says it’s three servings, but it’s really just one decent-sized one).  Cook about 4-5 minutes until the broccoli is no longer frozen.  Add the chickpeas, turmeric, and pinch of salt, and cook until the chickpeas are hot.  If you’re like me and love pepper, add some fresh-ground white or black pepper.  Serve with cool, crisp red pepper strips.  

    Serves one, or two as a side dish.  Doubles easily.  And as always, PLEASE experiment with the measurements and ingredients:  cook the red peppers with the broccoli, add onion, throw in a handful of spinach or cherry tomatoes, whatever you have on hand – PLAY with your food!

    Filed Under: Cooking Tips, Fast Recipes, Techniques Tagged With: broccoli, chickpeas, Fast meals, healthy, recipe

    Addicted to Acai Bowls!

    December 31, 2012 by Jennifer Silverberg Leave a Comment

    acaibowlI was lucky enough to spend most of October in Hawaii on business … and lucky enough to stay in a hotel that was right next to the most amazing little acai joint called Basik Acai (a don’t-miss if you’re in Kona!).

    I came home virtually addicted to these nutritional-powerhouse bowls of goodness (Dr. Oz: “Acai is a powerful antioxidant. Colorful dark foods like red wine, pomegranates, concord grapes, blueberries — they call them brain berries — are full of nutrients.”), and since there isn’t an acai bowl source anywhere near my home in Atlanta, I had to figure out how to make them on my own.  Luckily, they’re simple if you have a Vitamix, and you can have fun playing around with loads of different ingredients.

    TO MAKE:

    Using a strong blender, blend the following until creamy but still frozen:

    Frozen unsweetened pulp packets: Whole Foods sells the frozen Sambazon-brand pulp, but I’ve discovered I like Amafruits (which you have to order online) a little better – seems like less water, more fruit.  I use 1.5 – 2 packets per bowl, but experiment to see what you like.

    Liquid:  Just about anything you want, but I really like coconut water, coconut milk, homemade cashew milk, and/or greek yogurt.

    Other frozen fruit:  For me, frozen bananas (at least a bit) are a must – they make the texture nice and silky.  Mangoes are also nice.

    Whatever else you want to blend in!  I’ve used kale, edible green tea, peanut butter, almonds, cacao nibs, pomegranate, chia, and lots more.  Have fun!

    Spoon this mixture into a bowl, and liberally top with chopped fresh fruits (papaya, banana, blueberries, strawberries … you get the idea).

    Add texture with a sprinkling of granola, goji berries, crushed almonds, walnuts, unsweetened coconut, and/or flax seeds, etc.

    Finish with a drizzle of fresh local honey or maple syrup if you like.  I don’t normally add sweetener to anything, but Acai pulp is unsweetened, so just a touch of honey or maple syrup really builds the flavor.

    ENJOY!

    Filed Under: Food Choices, Recipes we LOVE, Superfoods Tagged With: acai, breakfast, fruits, recipe

    Are you ready to…

    Lets get social


    Want more? Follow us on social media.

    Take a look around

    Favorite Posts

    Recent Posts

    • COVID Has Reminded Us: Health REALLY Matters
    • Amazing and Easy Banana Bread
    • Healthy Resolution!
    • Happy Healthy Christmas Salad!
    • Quick Comfort Food: Grits and Greens (Plant Based!)

    Popular Posts

    101 Fast/Healthy/Fabulous Snack Ideas

    Copyright © 2025 · Foodie Child Theme by Shay Bocks · Built on the Genesis Framework · Powered by WordPress